
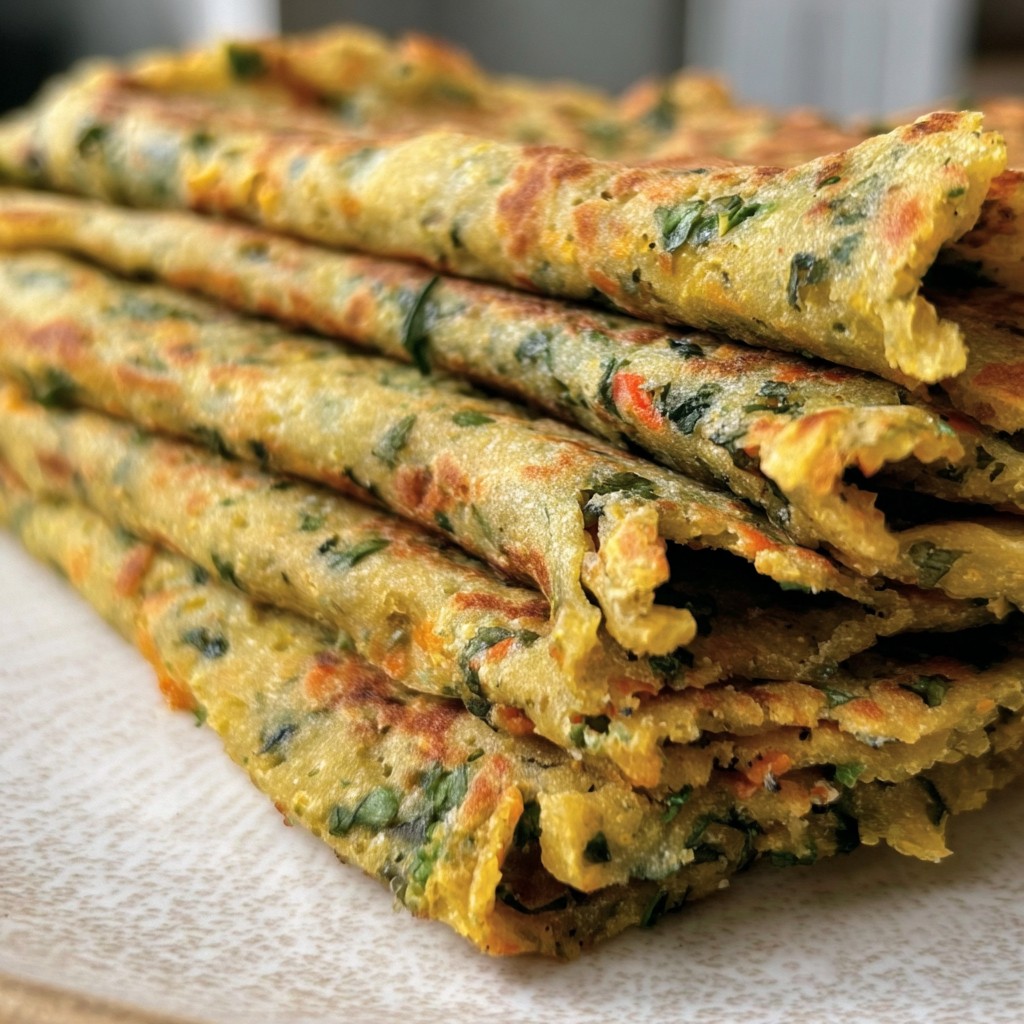
Straight from My Skillet: Cooking Chickpea Pancakes (Pudla)
Confession time: I didn’t even know what Pudla was until my third year of college. My housemate (big shoutout to Priya!) whipped them up on a rainy night and honestly, I’ve been hooked ever since. There’s something about chickpea pancake night that feels a bit like cheating at dinner? It’s cheap, filling, and every time someone hears it’s vegan they kinda raise their eyebrow – until they’re fighting for the crispy bit. These days, any time I want a savory breakfast or just need to use up scraggly leftover veggies, pudla gets the call-up. Plus, the cleanup’s a breeze if you use one pan, which is pretty much essential for me.
Why You’ll End Up Making This More Than Once
I make this when I’m feeling a little lazy but I still want it to look (and taste) like effort went into the meal. My family goes mad for these, especially when I add that extra squeeze of lemon over the top (even my brother, who’s suspicious of all things vegan, will eat these no questions). And you know those nights where the only vegetables left are slightly floppy – this is their redemption story. Oh, and if you’re avoiding gluten or eggs? Pudla is basically your new best mate.
Full disclosure: First time I tried this, my pancakes looked more like scrambled chickpea. But, honestly, that’s fine. Still edible. Still delicious.
Gather Your Pudla Stuff (It’s Not Rocket Science)
- 1 cup chickpea flour – sometimes called gram or besan flour. I grab whatever brand’s handy, but my gran swore by buying from the local Asian grocer (and I swear, it’s a bit tastier?)
- 1/2 to 3/4 cup water – depends how thick you want it. Go with your gut here.
- 1/2 tsp salt (add a little extra if you like living dangerously)
- 1/4 tsp turmeric – just for colour, but I skip it if I run out
- 1/2 tsp cumin seeds – or ground cumin if that’s what you’ve got
- 1 green chili, finely chopped (optional – I don’t always bother if I’m making it for breakfast)
- Handful chopped onions
- 1 small tomato, diced (or skip if you hate tomato – it’s all good)
- Some grated carrot or zucchini (on desperate fridge days, frozen corn works a treat)
- Fresh coriander or parsley, chopped
- Oil for frying – sunflower, canola, whatever’s kicking about
So, Here’s How You Cook Pudla (With Some Wiggle Room)
- Chuck the chickpea flour, salt, turmeric, and cumin seeds in a bowl. Mix them up; I use a fork (saves washing a whisk, honestly).
- Pour in half the water and start stirring. Don’t panic if it’s clumpy. Just keep stirring and add more water bit by bit until you’ve got a thick-ish batter – like pancake batter, but a smidge thicker. Actually, it sometimes helps to let it rest for 10 minutes if you’ve got time (I usually forget though).
- Stir in the onions, tomato, grated veg, herbs, and chili (if you feel like living on the edge). This is where I sneak a quick taste. And maybe a second taste, purely for *science*.
- Splash a little oil in your favorite frying pan – nonstick is king here, but I’ve managed with a battered old skillet, too. Heat over medium. (If the oil looks like the surface of a pond with a breeze, you’re good.)
- Ladle a blob of batter in; spread out with the back of your spoon until it’s about 6 inches wide, or whatever your heart desires.
- Fry for about 3-4 minutes, then flip with as much confidence as you can muster. Second side goes a bit quicker, maybe 2 minutes. If it breaks, just call it a rustic scramble and move on.
- Repeat with the rest of the batter. Sometimes I get three pancakes, sometimes four, depending on how greedy I’m feeling with the ladle.
Notes I Wish Someone Had Told Me Sooner
- Letting the batter rest actually does help things come together; on second thought, it’s worth the extra time if you can spare it.
- Don’t freak out if the first pancake falls apart. Happens to the best of us. Blame it on the pan temperature (I always do).
- Sometimes I overdo the veg and it won’t hold together. If this happens, just chop your veg a bit finer. Or ignore it and eat with a fork.

The Weird Experiments (AKA Variations)
- I’ve thrown in a sprinkle of garam masala before, and yeah, it’s a bit of a flavor bomb.
- Leftover curry as a filling – now that’s a next-day treat.
- Tried using almond flour – wouldn’t recommend, really. Went a bit mushy. Maybe you’ll have better luck?
- If you’re out of coriander, mint tastes surprisingly fresh (but parsley’s just fine, too).
About That Special Equipment (Or Not)
Lots of people say you need a good nonstick pan. Which, okay sure, it helps. But honestly, I once made these over a campfire with a wonky old skillet and it worked out (sort of). If it sticks, scrape and keep going. The odd crispy bit is basically a chef’s snack.
Pudla Storage: The Honest Truth
You can keep these pancakes in the fridge for two days, stacked with a bit of parchment between (so they don’t glue themselves together). Reheat gently in a pan or microwave. Though, if your household’s anything like mine, they’ll mysteriously vanish by the next morning anyway.
How We Eat Pudla Around Here (Serving Ideas)
Straight up, with a blob of coconut yogurt and a scattering of chopped onions on top. Or, if you’re feeling peckish, wrap torn pudla around salad leaves (I swear by this). My mate dips hers in chutney (like this coriander chutney recipe) and honestly, it’s top notch. For a quick lunch, I’ve also wrapped them around last night’s roast veg and called it a wrap – creative, right?
My Best Pudla Lessons (Pro Tips from Past Flops)
- Do not, I repeat, do not crank the heat while multitasking. I charred a pancake to oblivion once because I was distracted by a cat video.
- If the batter’s too runny, just sift a little more flour in. Patience is key here, or you’ll end up with chickpea soup (personal experience talking).
- I used to be scared to use big chunks of onion, but they actually give great texture. Give it a whirl.
Pudla Questions from My Inbox (and WhatsApp…)
- Is this gluten free?
- Yup, no wheat in sight. As long as your chickpea flour is just, well, chickpeas!
- Can I make these oil-free?
- Yeah, kind of. Use a really good nonstick or ceramic pan (I found a few good tips on this Forks Over Knives guide). Might not be quite as crispy, mind.
- Can I freeze them?
- Totally, though I think they’re best fresh. Freeze with parchment to separate, reheat in a dry pan for best texture.
- My batter’s lumpy – what’s the deal?
- Ahh, classic. Just keep whisking, or let it rest for a bit as some lumps dissolve. If you’re really keen, use a blender, but honestly, hand mixing works for me.
And if you’re still curious or bored and want more Indian pancake ideas, this site has some fun riffs on the classics. I could go on, but then I’d just get hungry again.
Anyway, if you have leftover pudla, consider yourself lucky! Stick it in a lunchbox with a squeeze of lemon and you’re laughing. Enjoy, mate!
Ingredients
- 1 cup chickpea flour (besan)
- 1/2 cup water
- 1/2 small red onion, finely chopped
- 1 small tomato, finely chopped
- 2 tablespoons fresh coriander (cilantro), chopped
- 1 green chili, finely chopped (optional)
- 1/2 teaspoon turmeric powder
- 1/2 teaspoon cumin seeds
- 1/2 teaspoon salt (or to taste)
- 2 tablespoons oil (for cooking)
Instructions
-
1In a large mixing bowl, combine chickpea flour, turmeric powder, cumin seeds, and salt. Mix well.
-
2Add chopped onion, tomato, cilantro, and green chili to the dry ingredients. Pour in water gradually, whisking to form a smooth batter without lumps.
-
3Heat a non-stick skillet over medium heat and brush lightly with oil.
-
4Pour a ladleful of batter onto the skillet, spreading it gently into a pancake shape. Drizzle a few drops of oil around the edges.
-
5Cook for 2–3 minutes until bubbles form and the bottom is golden brown, then flip and cook for another 2 minutes until both sides are cooked through.
-
6Remove from skillet and repeat with remaining batter. Serve warm with chutney, vegan yogurt, or your favorite toppings.
Approximate Information for One Serving
Nutrition Disclaimers
Number of total servings shown is approximate. Actual number of servings will depend on your preferred portion sizes.
Nutritional values shown are general guidelines and reflect information for 1 serving using the ingredients listed, not including any optional ingredients. Actual macros may vary slightly depending on specific brands and types of ingredients used.
To determine the weight of one serving, prepare the recipe as instructed. Weigh the finished recipe, then divide the weight of the finished recipe (not including the weight of the container the food is in) by the desired number of servings. Result will be the weight of one serving.
Did you make this recipe?
Please consider Pinning it!!


Leave a Comment